12U Wall-Mounted Network Cabinet: Features and Installation Guide
One essential component of network management is the 12U wall-mounted network cabinet.
This compact and convenient solution offers numerous advantages, making it widely used in telecommunication rooms, classrooms, retail stores and offices.
In this article, we will explore the features of the 12U wall-mounted network cabinet and provide a comprehensive guide for network wiring and installation.
1. Features of the 12U Wall-Mounted Network Cabinet
-
Transparent Tempered Glass Door: The cabinet's door is designed with transparent tempered glass, allowing for a clear view of the equipment while ensuring aesthetic appeal and security. The side panels are lockable and removable, facilitating easy wiring and equipment installation.
-
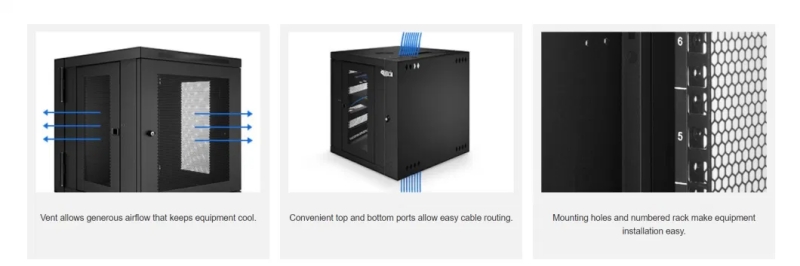
Efficient Cooling: The top of the 12U wall-mounted network cabinet features ventilation openings, which accelerate heat dissipation. Additionally, strategically placed cable entry points on the top, bottom, and rear enable convenient cable management during installation.
-
High-Quality Construction: The cabinet is constructed from premium SPCC cold-rolled steel plate, which is treated with rust-proof phosphating and electrostatic spray-painting. This ensures excellent heat dissipation, usability, safety, and ease of operation, installation and maintenance.
-
Versatile Equipment Support: The 12U wall-mounted network cabinet supports computer servers and data storage devices, making it suitable for comprehensive computer network wiring systems. Its professional and flexible design provides a comprehensive cabinet solution.
-
Adjustable Cable Management: The cabinet is equipped with a fully integrated and adjustable vertical cable manager, providing appropriate pathways for cables. The adjustable mounting rail system supports installation of any 19-inch standard rack-mounted equipment.
2. Installation and Wiring Guide for the 12U Wall-Mounted Network Cabinet
Cabinet Installation
- Gather the necessary tools, including cable pliers, scissors, tape measure, protractor, screwdriver, screws, saw and pipe bender.
- Use a tape measure and protractor to determine the ideal installation position for the 12U wall-mounted network cabinet.
- Securely mount the cabinet using screws at the designated location.
- Assign equipment identification numbers after installation.
Installation of Equipment Inside the Cabinet (Using a Switch as an Example):
- Unpack the switch from its packaging.
- Install two brackets on the switch, ensuring correct orientation.
- Place the switch in the pre-designed position within the cabinet and secure it to the vertical columns using screws. Leave sufficient space above and below the switch for airflow and heat dissipation.
- Ground the switch's casing and connect the power cord to the rear power interface.
- Power on the switch and check for any shaking or instability. If observed, inspect the height of the padding or the tightness of the screws on the cabinet.
Installation of Patch Panels inside the 12U Wall-Mounted Network Cabinet:
- Verify the completeness of the patch panels and accessories.
- Mount the patch panels on the designated vertical columns within the cabinet.
- Utilize cable ties and cable management to organize the cabling, ensuring a tidy and visually pleasing wiring arrangement.
- For non-through patch panels, perform termination and punch-down procedures.
- Apply labels for easier identification.
3. Important Considerations
-
When installing the 12U wall-mounted network cabinet, ensure there is no interference with power lines. Use cardboard templates for precise hole alignment based on the provided diagrams.
-
When installing equipment such as switches, avoid overtightening the screws, as it may cause tilting. Conversely, loose screws can lead to unstable operation and device shaking.
-
During the installation of patch panels inside the cabinet, ensure consistent cable sequencing (e.g., following color-coded indications). Maintain perpendicular alignment between the wire termination tool and the patch panel. Avoid cable crossings and ensure proper positioning of each twisted pair. The patch panels should be installed in corresponding holes without a horizontal deviation greater than 2 millimeters.
As data center construction moves towards enhanced overall availability, the demand for small-scale network wiring, including the 12U wall-mounted network cabinet, continues to grow.
This versatile and feature-rich solution offers a compact form factor, efficient cooling, high-quality construction, and excellent cable management capabilities.
By following the installation and wiring guidelines provided in this article, businesses can ensure a well-organized and functional network infrastructure, supporting their digital requirements with ease and reliability.